Hacklink panel

Hacklink Panel

Hacklink panel

Hacklink panel

Backlink paketleri

Hacklink Panel

Hacklink

Hacklink

Hacklink

Hacklink

Hacklink

Hacklink panel

Hacklink panel

Hacklink panel

Hacklink panel

Hacklink panel

Hacklink panel

Hacklink panel

Hacklink panel

Hacklink panel

Hacklink panel

Hacklink panel

Hacklink panel

Hacklink panel

Hacklink panel

Hacklink satın al

Hacklink panel

Hacklink panel

Hacklink panel

Hacklink panel

Hacklink panel

Hacklink panel

Hacklink panel

Hacklink panel

Hacklink panel

Hacklink panel

Hacklink panel

Hacklink panel

Hacklink panel

Hacklink panel

Hacklink panel

Hacklink panel

Hacklink panel

Hacklink panel

Hacklink panel

Illuminati

Hacklink

Hacklink Panel

Hacklink

Hacklink Panel

Hacklink

Masal oku

Hacklink Panel

Hacklink Panel

Hacklink panel

Masal Oku

Hacklink

Hacklink panel

Hacklink panel

Hacklink panel

Hacklink panel

Hacklink

Hacklink

Hacklink

Hacklink panel

Hacklink panel

Hacklink panel

Hacklink

Hacklink

Buy Hacklink

Hacklink

Hacklink satın al

Hacklink panel

Hacklink panel

Hacklink panel

Hacklink panel

Hacklink panel

Hacklink panel

Hacklink panel

Hacklink panel

Hacklink panel

Hacklink panel

Hacklink panel

Hacklink panel

Hacklink panel

Hacklink panel

Hacklink

Hacklink panel

Hacklink panel

Hacklink panel

Hacklink panel

Hacklink panel

Hacklink panel

Hacklink panel

Hacklink panel

Hacklink panel

Hacklink panel

Masal Oku

Hacklink panel

Hacklink satın al

Hacklink Panel

unblocked games

Türk Seks

Hacklink satın al

Hacklink

tubidy

unblocked games

How to Fix Blown Fuse in House Step by Step

crackstreams

Hacklink Panel

new unblocked games

casibom giriş

Hacklink Panel

Hacklink Panel

Hacklink Panel

Hacklink Panel

Hacklink Panel

Hacklink Panel

Hacklink Panel

Hacklink Panel

Hacking forum

Hacklink panel

streameast

istanbul escort

pokerklas

grandpashabet

jojobet giriş

https://onay360.com/

maxwin, maxwin giriş

casibom

cratosroyalbet

jojobet

avrupabet

elitbahis

casival

celtabet

avrupabet

betlivo

parmabet

betnis

parmabet

betmarino

realbahis

lordcasino

lordcasino

aresbet

betra

gallerbahis

gobahis

hazbet

zirvebet giriş

betra

luxbet

betmarino

celtabet

casival

luxbet

millibahis

betlivo

betcool

realbahis

gallerbahis

millibahis

gobahis

betnis

betmarino

lordcasino

pusulabet, pusulabet giriş

alobet, alobet giriş

Torkbet giriş

deneme bonusu

prison break izle

casibom giriş

deneme bonusu

tümbet

tümbet giriş

pasacasino

interbahis

casinofast giris

sakarya escort

StreamEast

mavibet

Watch Repair Experts, Watch Repairs USA, Jewelry Repair, Watch Repairs, Jewelry Repair USA, Watch Repairs USA Trusted, Watch Repairs Trusted and Cheap, Watch Repairs Free Shipping, Watch Repairs Delivery World, Watch Repairs USA Legit, fixing my watch near me, Watch Repairs USA Near Me, Online watch Repair Services, Watch Repair in USA

kavbet

enjoybet

sakarya escort

ligobet

Totalsportek

casibom

jojobet giriş

Samsun Avukat

StreamEast

sezarcasino

free stresser

sezarcasino

koora live

sezar casino

sezarcasino

jojobet

Jojobet

sekabet

casibom

matbet

mavibet

meritking

dedektör

vdcasino giriş

Robinbet

grandpashabet

casibom

grandpashabet

jojobet

holiganbet

jojobet

bets10 sorunsuz giriş

betsat

jojobet

tambet

ultrabet

Totalsportek

jojobet

piabellacasino

Dating reply generator

setrabet

pulibet

jojobet

jojobet

kulisbet

holiganbet

mavibet

marsbahis

kingroyal

bets10

bets10 giriş

kktc satılık daire

sikiş

casino siteleri

deneme bonusu

deneme bonusu veren siteler

vipslot

vipslot

betcool

celtabet

hazbet

mavibet giriş

megabahis giriş

megabahis

mavibet

piabellacasino

holiganbet giriş

mavibet giriş

piabellacasino

piabellacasino giriş

holiganbet

mavibet giriş

piabellacasino giriş

deneme bonusu

deneme bonusu

casibom

marsbahis giriş

festwin

deneme bonusu

streameast

vdcasino

vdcasino

vdcasino

jojobet

jojobet giriş

sekabet

casibom güncel giriş

casibom giriş

meritking

bets10

bets10 giriş

avrupabet, avrupabet giriş

tipobet

deneme bonusu

deneme bonusu

bets10

bets10 giriş

betsat

yalla shoot

يلا شوت

meritbet

meritbet giriş

dinamobet giriş

casibom

casibom giris

casibom

casibom giris

jojobet

jojobet giris

casibom

casibom giris

casibom

casibom giris

grandpashabet

grandpashabet giris

grandpashabet

grandpashabet giris

jojobet

jojobet giris

jojobet

jojobet giris

jojobet

jojobet giris

maritbet

casibom

Hacklink panel

fixbet güncel giriş

milanobet

test55

Hacklink panel

Hacklink giriş

capitolbet

sakarya escort

jojobet

jojobet

jojobet

jojobet

CrackStreams

Casibom

marsbahis

betturkey giriş

casibom

casibom

deneme bonusu veren siteler

meritking

marsbahis giriş

deneme bonusu

betsa

meritking

meritking

meritking

meritking

madridbet

meritking

deneme bonusu

spyhackerz

jojobet

uyuşturucu satın al

jojobet giriş

imajbet

royalbet

İmajbet

ankara escort

İzmit Escort Bayan

betface

betface

piabellacasino giriş

casibom

deneme bonusu

casibom giriş

turkbet

deneme bonusu veren siteler

deneme bonusu veren siteler

deneme bonusu veren siteler

deneme bonusu veren siteler

deneme bonusu veren siteler

casinoroyal giriş

perabet

deneme bonusu

meritking

betpark

vdcasino

How to Create a Hipster Lighting Effect in Photoshop

If you’re eager to give your photos a hipster and vintage charm, adding a sepia and vintage light leak effect can create striking visuals. In this article, we will guide you through the process of creating a hipster lighting effect in Adobe Photoshop. You’ll learn how to apply sepia tones, add vintage light leaks, and adjust the overall atmosphere to achieve the desired hipster look. Whether you want to evoke a sense of nostalgia, add a touch of artistic flair, or experiment with creative enhancements, this tutorial will equip you with the skills to create a captivating hipster lighting effect in Photoshop. Let’s dive in and unlock the potential of this effect to infuse your photos with a unique and timeless vibe!

Adding the Hipster Lighting Effect

First thing you need to do is open your image in Photoshop.

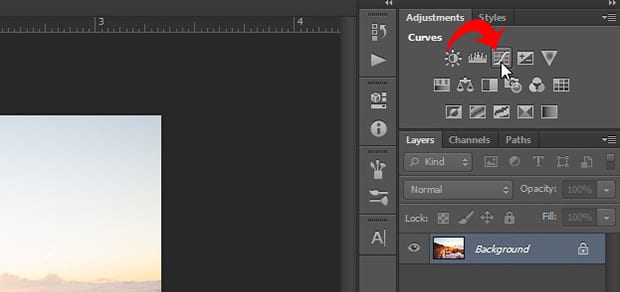
We will be working with Adjustment layers, so make sure the Adjustments panel is visible in the right-hand side of your Photoshop screen (if it is not available, then go to Window » Adjustments).

Lets start with the Curves adjustment layer. To add it, click on the icon that looks like an S-curve inside the Adjustments panel.

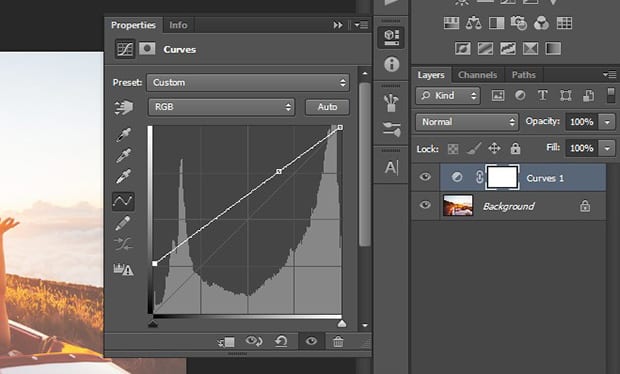
In the settings for this layer, you’ll need to adjust the curve on RGB as shown in the image below:

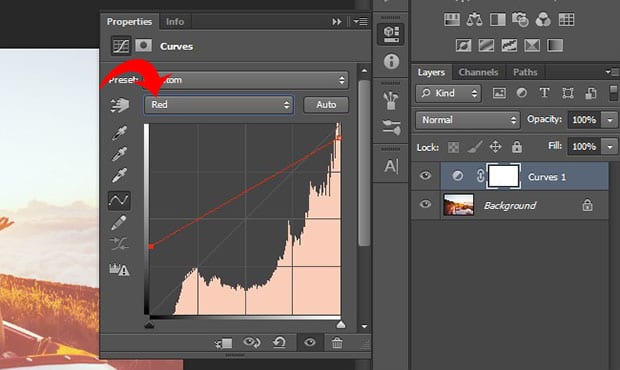
After adjusting the RGB, select Red from the dropdown menu and adjust the curve as shown below:

Next, set the dropdown to Blue and adjust the curve as shown below:

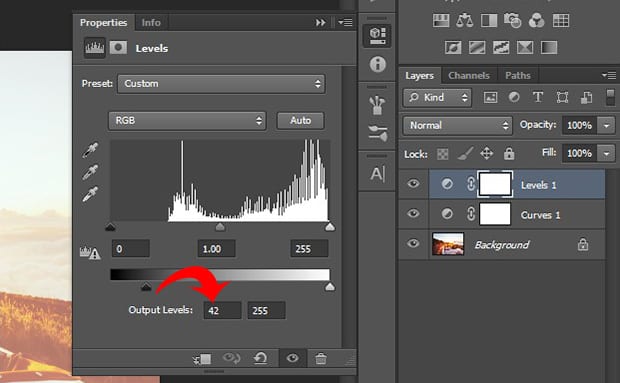
For the next step, you’ll need to create a new Levels adjustment layer.

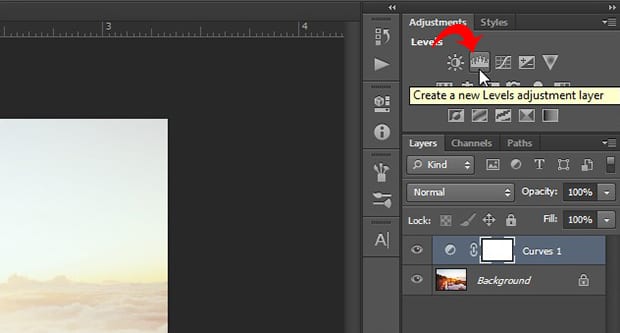
Simply set the Output Levels to 42 in the first box that is 0 by default. This will create a faded effect.

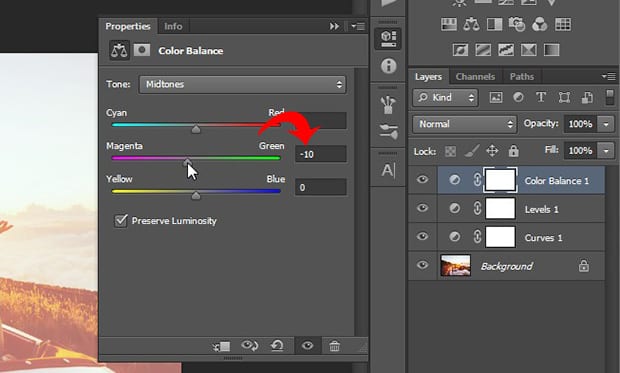
After adjusting the Levels layer, it’s time to create a Color Balance adjustment layer.

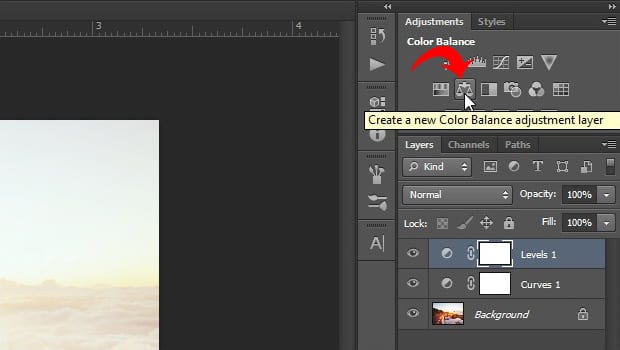
Go ahead and set the Magenta-Green to -10. Make sure that the Tone is set to Midtones.

Next, select the Shadows from the Tone dropdown. Then set the values as follows:

Cyan-Red: +25
Magenta-Green: -3
Yellow-Blue: -10

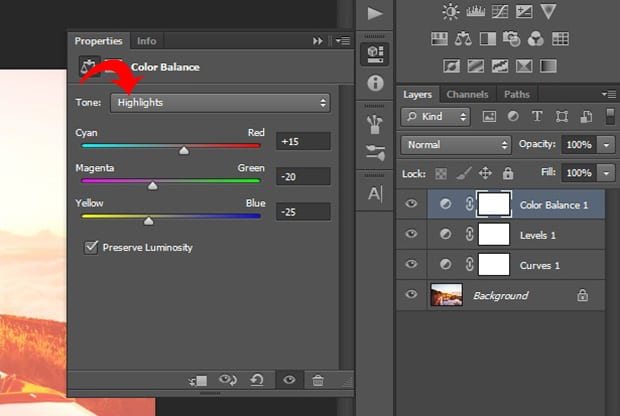
After the Shadows, select Highlights from the Tone dropdown and change the values as follows:

Cyan-Red: +15
Magenta-Green: -20
Yellow-Blue: -25

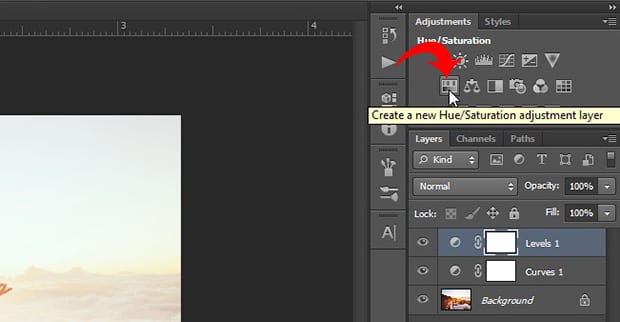
Next, select the Hue/Saturation adjustment layer.

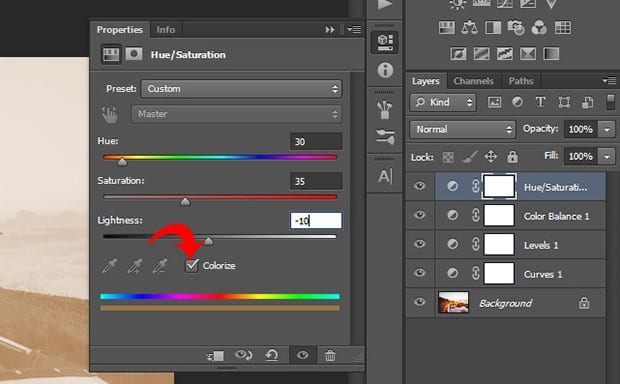
Simply set the following values and make sure that the Colorize check box is tick marked:

Hue: 30
Saturation: 35
Lightness: -10

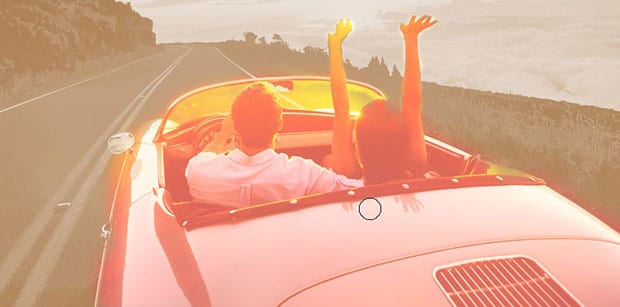
Your image now has a sepia tone effect!

Since the adjustment layers come with a layer mask, you can simply choose the Brush Tool from the toolbar at the left-hand side, and brush over the important objects in the image so they pop out.

We’re brushing the car and the passengers, so they will get their colors back, but the rest of the image keeps the faded effect.

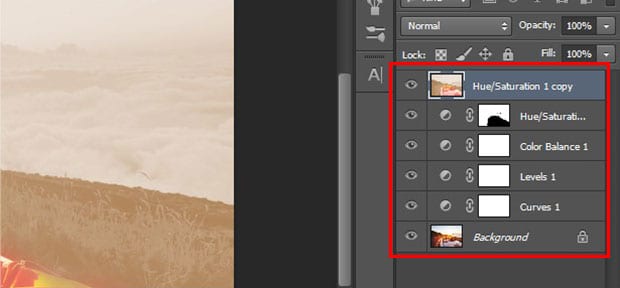
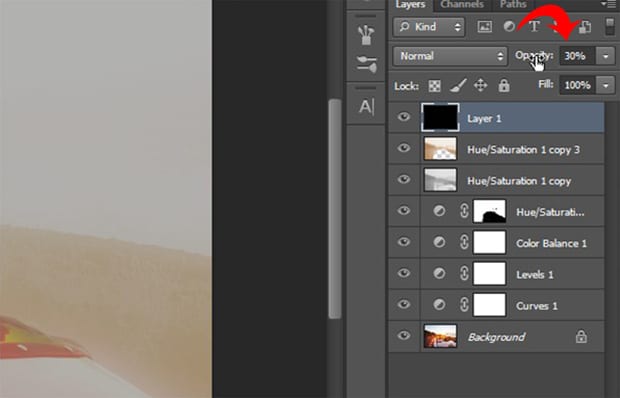
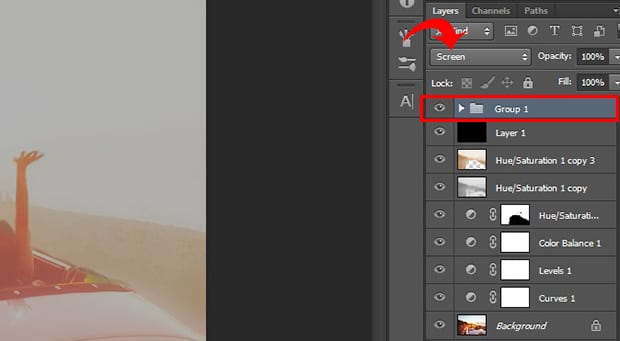
In the next step, you should select all the layers in the Layers panel. Then press Ctrl + J to duplicate, and Ctrl + E to merge the layers.

Your Layers panel will look as shown in the image below:

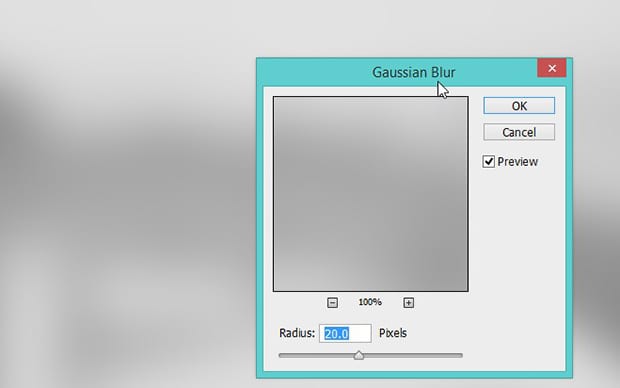
Now you should go to Image » Adjustments » Desaturate and then go to Filter » Blur » Gaussian Blur. Set the Radius to 20 pixels.

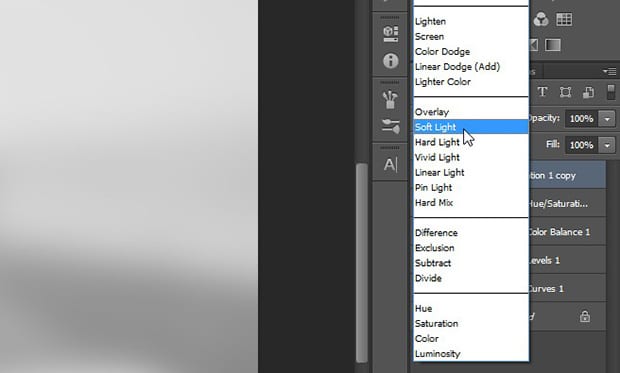
Set the blend mode of the layer to Soft Light.

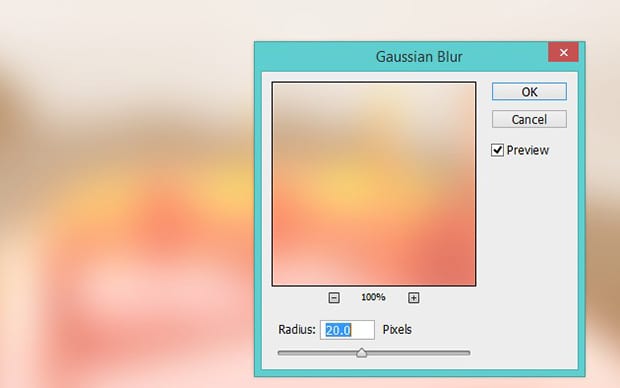
Go ahead and select all the layers again. Then press Ctrl + J to duplicate and Ctrl + E to merge the layers together.

Next, go to Filter » Blur » Gaussian Blur and set the Radius to 20 pixels.

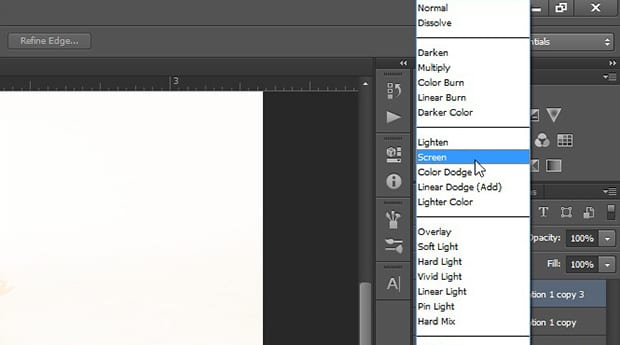
You’ll need to set the blending mode of the layer to Screen, and select the Eraser tool from the toolbar to remove the blur from your subject and any important objects.

In the next step, add a new layer by going to Layer » New » Layer and fill it with a black color using the Paint Bucket Tool. Set the Opacity to 30%.

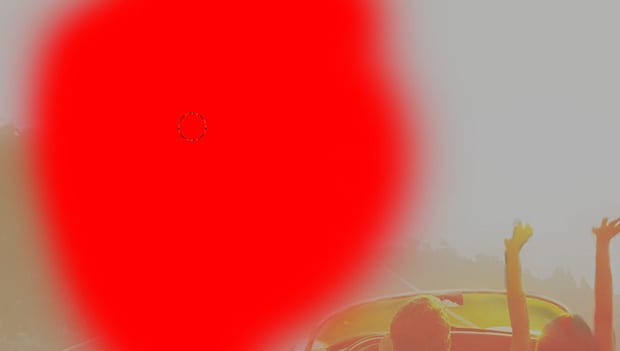
Now go to Layer » New » Layer to add a new layer again. Select the Brush Tool and set it to a red color. Go ahead and brush over an area of the image with the soft red color.

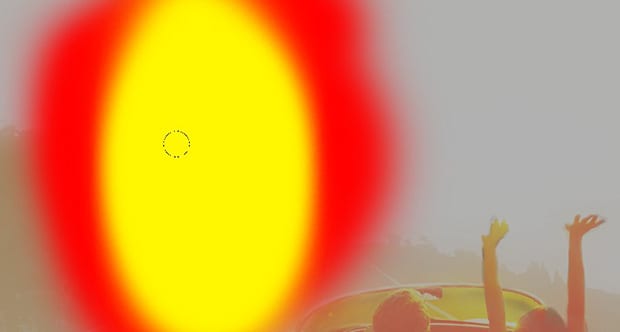
After the red, you should add another layer from Layer » New » Layer, and set the brush to yellow. Brush the yellow in the middle of the red spot.

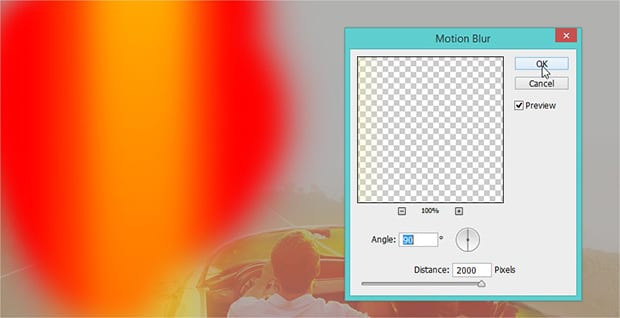
Next, go to Filter » Blur » Motion Blur, and set the Angle to 90. You can set the Distance slider to the maximum.

Go ahead and select these two layers with the red and yellow colors. Press Ctrl + G to add them in a group, and then should change the blending mode of the group to Screen.

Repeat the same process with two new layers and place the red and yellow spots at the bottom-right corner of your image (or simply copy and paste the red and yellow layers you already created, and move the copy to the bottom-right corner). Add a Motion Blur and put them into the group. Change the blend mode of the entire group to Screen.

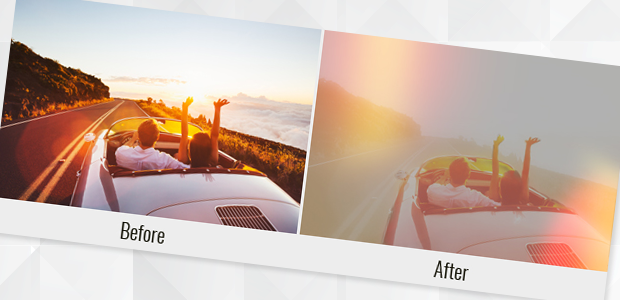
That’s all. You can see the before and after image below.